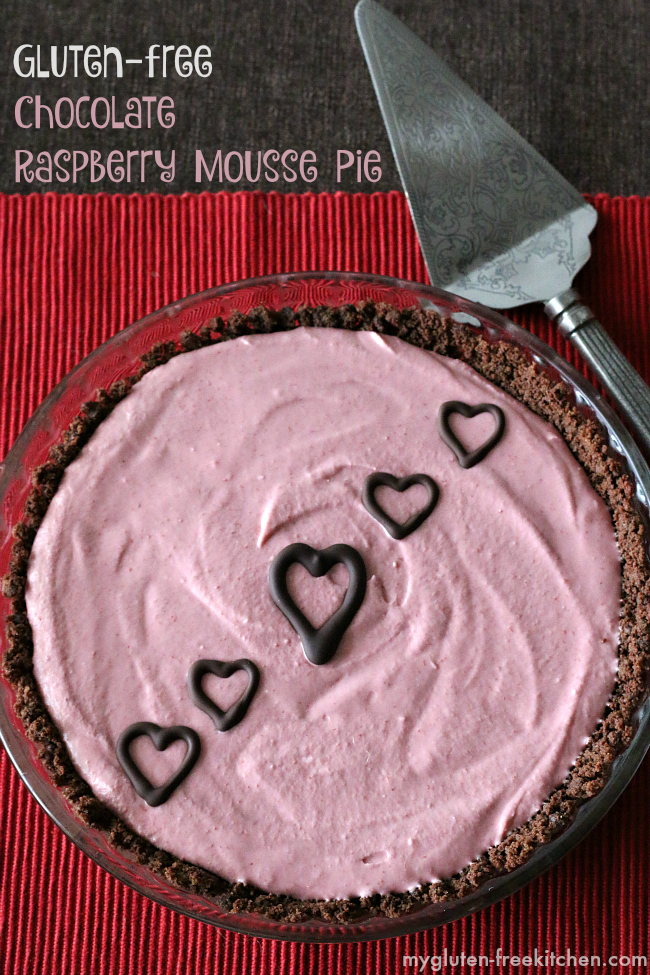
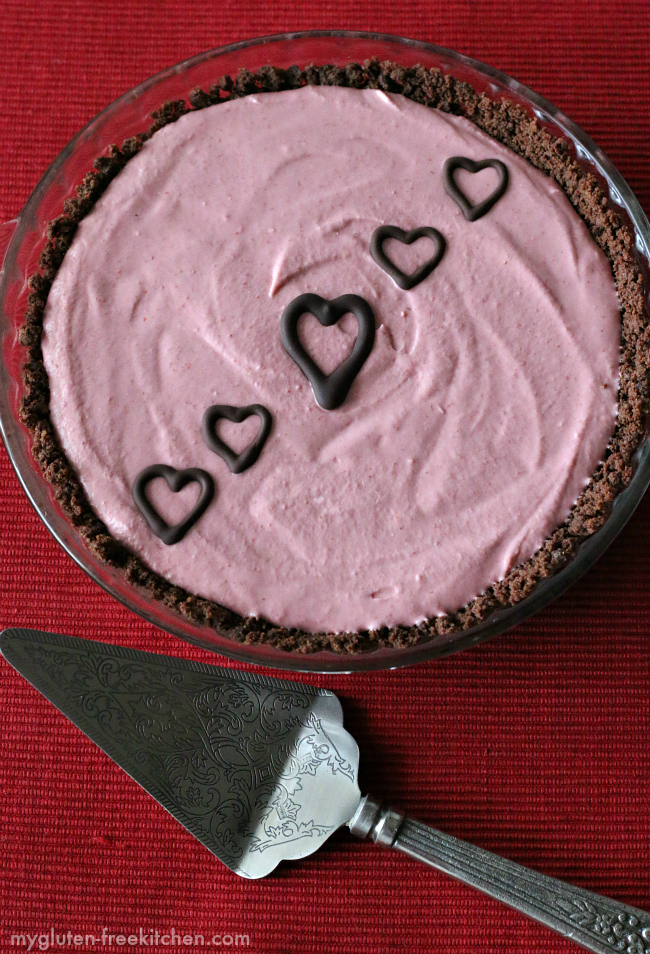
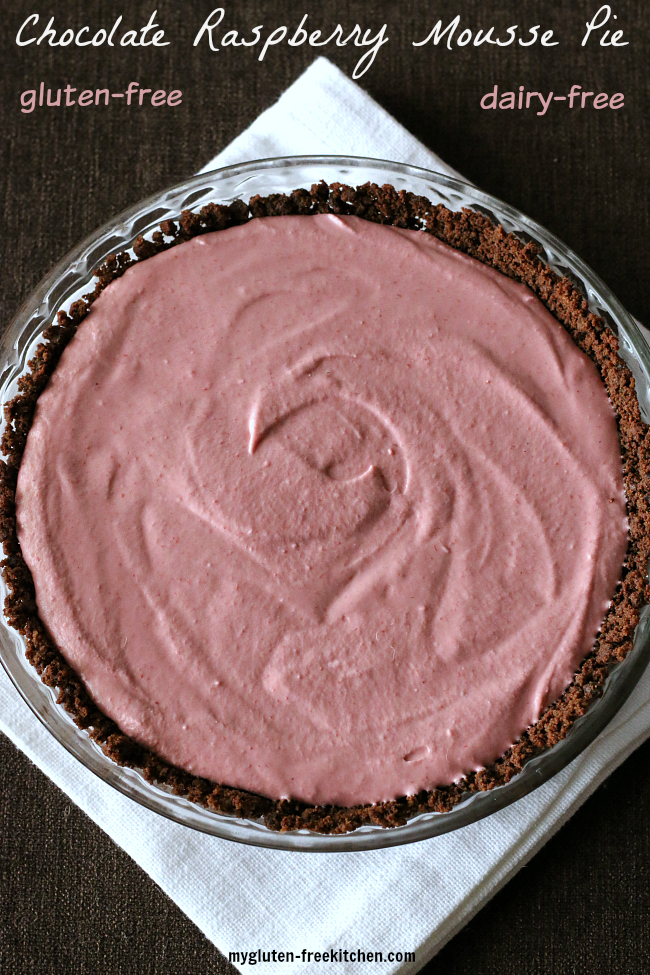
Gluten-free Chocolate Raspberry Mousse Pie {Dairy-free}
Pretty and delicious, this gluten-free chocolate raspberry mousse pie would be a fun treat for Valentine’s Day or anytime! It’s dairy-free too! Raspberry Mousse plus chocolate equals delicious!
A couple weeks ago, I was brainstorming what to make for my next recipe that I would develop for my partnership with Enjoy Life Foods. They’ve been sweet to work with, sponsoring several posts recently and during this coming year, including today’s post. Since it is February, I wanted to feature a recipe with their gluten-free, dairy-free chocolate, and wanted to tie it in with a Valentine’s theme.
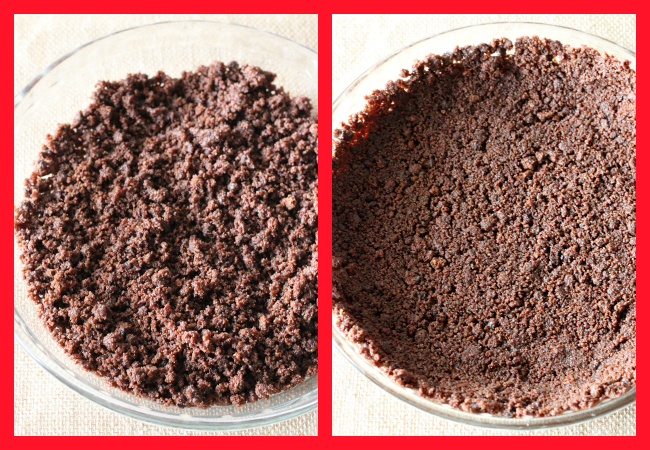
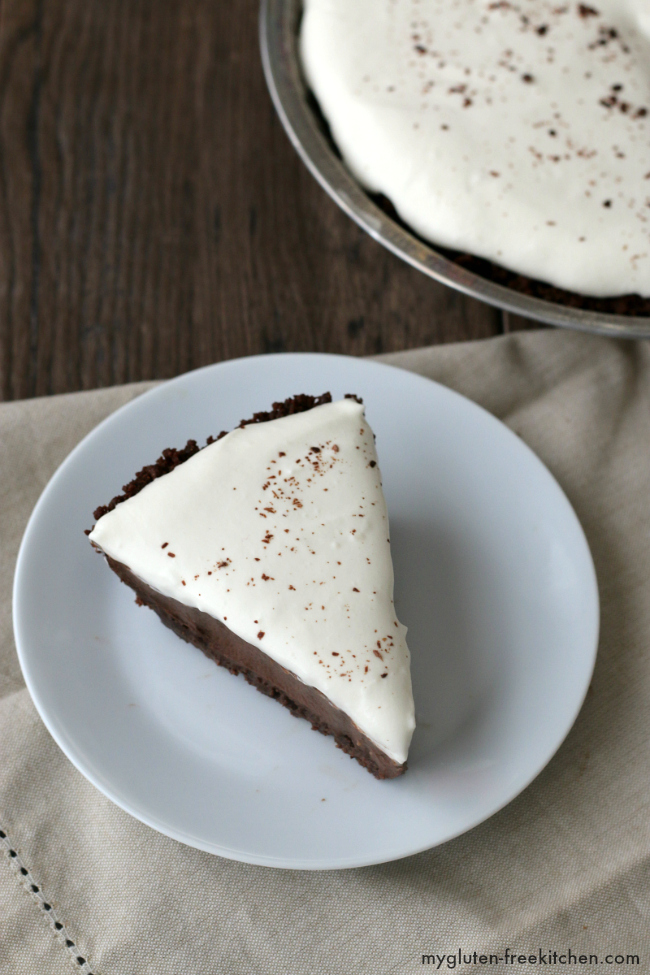
I started by grabbing a box of Enjoy Life Foods’ Double Chocolate Crunchy Cookies. I’ve had these in my pantry for a while, saving them to make a cookie crust with. I thought they would make the perfect chocolate cookie crust for a pie, and I was right!
I mixed the cookies in my mini food processor to make crumbs, added some brown sugar and melted coconut oil to hold it all together, and pressed it in a pie plate. I took a couple photos just so you could see the coarse texture of the crumbs after blending together and placing in the pan, and what it looks like once the crust is pressed into the pan.
I wanted to include something pink, and decided to do a raspberry mousse, because I love everything raspberry and thought the flavors would pair well and it would be a pretty dessert. The challenge was making this mousse dairy-free.
Most mousse recipes call for adding freshly whipped cream. I had seen a few posts on other blogs, including this helpful tutorial for coconut whipped cream from Gimme Some Oven, that showed how to make whipped cream with a can of full-fat coconut cream. I had bought a few cans of Trader Joe’s coconut cream a few weeks ago, wanting to try this idea out. Now seemed like the perfect time, as I could make this dairy-free whipped cream and use it in the raspberry mousse.
I tried following a few raspberry mousse recipes that I found online, adapting them with this dairy-free whipped cream, but they just weren’t quite right. One had great flavor but reminded us too much of the consistency of Jello, which isn’t what I was going for. Another yielded a mousse with great texture and flavor, but was a very pale pink – not the look I was going for.
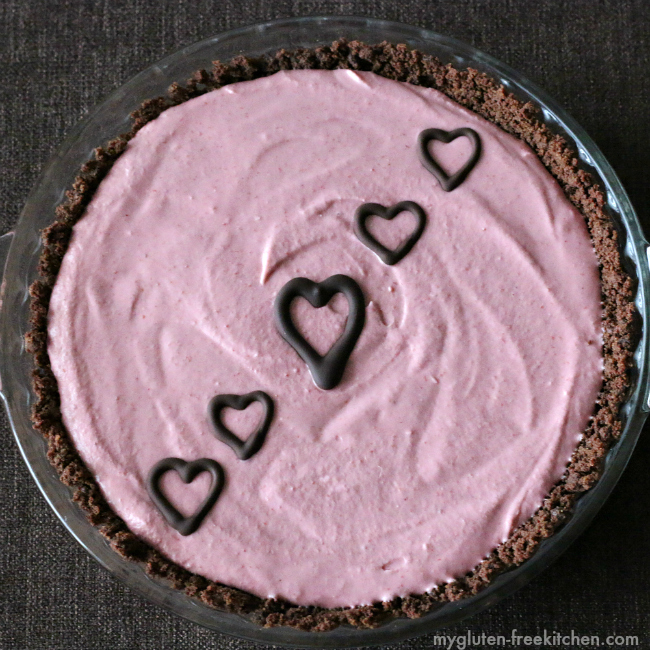
Finally on the third try, everything turned out just right. The coconut whipped cream I linked to above worked well. The dairy-free raspberry mousse came out with great flavor, texture and color. The gluten-free chocolate cookie crust came out perfect, and the chocolate decorations were cute and yummy! I love it when an idea comes together!
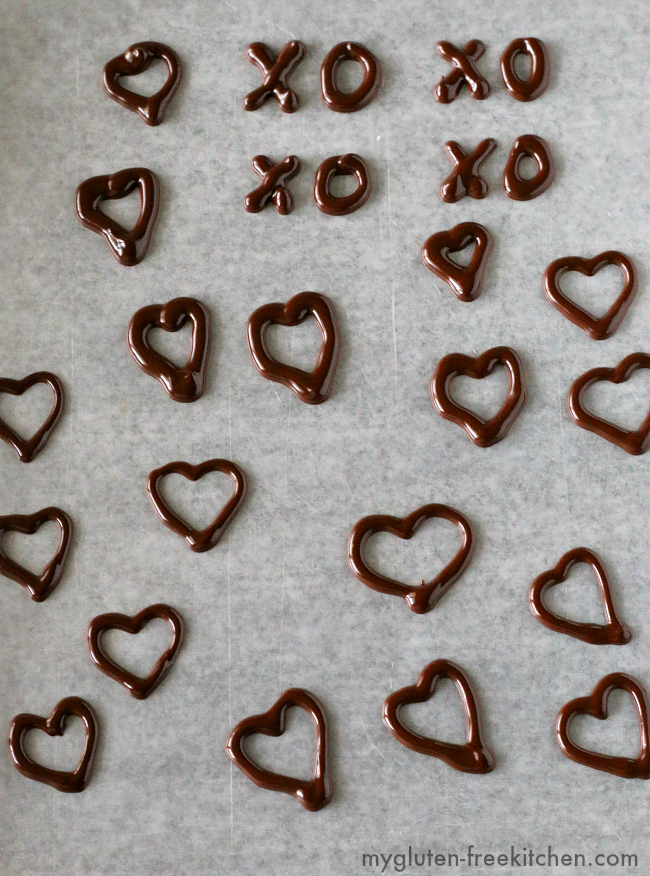
For the chocolate decorations, I just whisked together Enjoy Life Foods’ chocolate chunks with a bit of organic vegetable shortening over low heat, until melted. I poured the melted chocolate into a squeeze bottle and squeezed the chocolate out onto wax paper in the shapes I desired. After some time in the fridge, the shapes are nice and firm so you can add to the dessert. You can lay them flat or have them standing up on each individual serving too.
Here’s a look at the chocolate shapes. As you can see, I had to practice a lot in order to get some good heart shapes!! You don’t need to make anywhere near this many shapes! My family enjoyed munching on them though, so I’m glad I melted as much as I did!
Notes on ingredients and substitutions for this gluten-free raspberry mousse pie:
- Gluten-free Chocolate Cookies. I used Enjoy Life Foods’ Crunchy Double Chocolate Cookies. They worked perfectly for this crust!
- Coconut Cream – Do not use coconut milk! You want coconut cream. Brands will vary, and I haven’t tested them all. I used Trader Joe’s coconut cream but other full-fat, canned varieties should work well too. You want to chill the can (unopened) overnight. Then when you are ready to make this, you will open the can and scoop out only the hardened coconut cream, leaving the liquid in the can for another use or to dispose.
- Raspberries – You want to use unsweetened raspberries. I much preferred using frozen raspberries. Fresh raspberries this time of year just aren’t very deep red, so the result is a much more pale mousse. Using previously frozen berries (thawed) yielded a prettier color and were cheaper than fresh.
- Sugar – I believe you could successfully use other sweeteners in this recipe without issues. Give it a try with your preferred alternative like honey, stevia or coconut sugar.
- Chocolate – To make this dairy-free, I used Enjoy Life Foods Mega Chunk semi-sweet morsels. They melted easily and hardened up again for the drizzled shapes.
- Vegetable Shortening – I opted for an organic vegetable shortening to use with the melted chocolate. This adds a bit of shine to the melted chocolate. You could also use coconut oil for this.
Did I mention that February is going to be chocolate month here on My Gluten-free Kitchen? Yep, all the recipes I post this month will feature chocolate. I did this two years ago and had so much fun that I wanted to bring it back again. I hope you enjoy all of my chocolate recipes this month!
Let me know if you make this sweet treat for your sweeties!
Gluten-free Raspberry Mousse Pie Recipe:
Gluten-free Chocolate Raspberry Mousse Pie
It is very important that your can of coconut cream be chilled completely, so be sure to put it in the fridge the day before you want to make this. It needs to chill at least 12 hours.
Ingredients
Cookie Crust:
- 1 box (6.3 oz) Enjoy Life Foods Double Chocolate Crunchy Cookies
- 2 Tbsp. brown sugar
- 1/3 cup melted coconut oil or favorite allergy friendly oil
Raspberry Mousse:
- 12 oz. bag frozen unsweetened raspberries
- 1/2 cup sugar
- 1/4 cup cold water
- 1 teaspoon unflavored gelatin powder (not a whole envelope)
- 1 tsp. pure vanilla extract
- 1 can (14 oz.) Coconut Cream (not coconut milk, not light)
Chocolate decorations:
- 4 oz. (about 3.4 cup) Enjoy Life Foods Chocolate Mega Chunks
- 1 tsp. organic vegetable shortening or coconut oil
Instructions
- Before starting: be sure your sealed can of coconut cream has chilled for at least 12 hours. Place your mixing bowl and beaters in the refrigerator for later use whipping. I use my stainless steel KitchenAid bowl with the whisk attachment.
Cookie Crust:
- Remove cookies from packaging and pulse them all in a food processor, until you have coarse crumbs, with larger chunks of chocolate chips. You may need to do this in two batches, depending on the size of your food processor. This will yield just about 2 cups of cookie crumbs.
- Transfer cookie crumbs to a medium or large bowl and add brown sugar. Use spatula or whisk to mix together well.
- Pour the melted coconut oil over the cookie crumb mixture. Stir with a spatula until all is wet and well mixed.
- Press cookie mixture into a 9" pie pan that has been sprayed with cooking spray. Press evenly all over bottom and up sides of pan.
- Bake in a 375° oven for 8 minutes. Remove from oven and place on a cooling rack to cool completely.
Raspberry Mousse:
- Thaw the frozen raspberries to room temparature. I use the microwave to speed this along. Add berries, and their juices, to food processor or blender. Add 1/2 cup sugar and 1/4 cup cold water, and puree until smooth, about 45 seconds.
- Place a mesh strainer over a medium sized bowl. Pour the raspberry puree through the mesh strainer, into the bowl, to remove seeds. You'll end up with about 1 1/3 cup seedless puree.
- Discard the seeds in strainer.
- Place half of the puree in a small saucepan. Sprinkle the gelatin powder over the top. Note that this is just one teaspoon of gelatin powder, not a whole envelope. Let sit for 5 minutes.
- Place the saucepan over low heat and whisk while heating mixture just until starts to simmer, about 3 minutes. Remove from heat and allow to cool for 10 minutes.
- Meanwhile, remove your can of coconut cream, mixing bowl and beaters from refrigerator. Open the chilled can of coconut cream. Use a spoon to scoop out all of the solid coconut cream into the mixing bowl, leaving any liquid in the can for alternate use or disposal.
- On medium-high speed, whip the coconut cream until smooth and stiff peaks form, about 5 minutes. You'll end up with about 2 cups of whipped coconut cream. Set aside.
- Whisk the puree with gelatin into the other half of reserved raspberry puree. Whisk in 1 teaspoon pure vanilla extract.
- Gently fold the raspberry puree into the whipped coconut cream until fully combined. I did a folding motion with my spatula, over and over, instead of stirring. This does take a minute or two.
- Gently scoop and spread the raspberry mousse into the cooled cookie crust and place in fridge. You could also place in freezer if you want it less mousse-like and more like a frozen pie. Either way it is good!
Chocolate decorations:
- In a small saucepan, whisk together chocolate mega chunks and one teaspoon of organic vegetable shortening until melted and smooth. Pour into a pastry decorating bag or a squeeze bottle. Lay a sheet of wax paper on a cookie sheet or jelly roll pan. Squeeze the chocolate out of small hole in pastry decorating bag or squeeze bottle. You can make whatever shapes you'd like! There is plenty of chocolate in this mixture for some practice shapes too. When finished, place whole pan in the refrigerator to set.
- When ready to serve pie, remove from refrigerator, add desired shapes, cut and serve!
Notes
The chocolate decorations are entirely optional! It's delicious with or without them!
This sponsored post was created through my partnership with Enjoy Life Foods. As always, all opinions are my own. Collaborating with brands I love allows me to keep bringing you new and varied recipes! Thanks for your support!
I hope you and your family enjoy this raspberry mousse as much as mine did!
If I don’t have any gelatin, is there a substitute I could replace it with or would it hold up ok without?
Hi! This sounds great! Just wondering if the mousse sets up firm or if it is loose? I actually want to use just the mousse for a filling between the layers of a chocolate cake. Will it stand up to that or will it all just ooze out the sides? Do you have any suggestions on how to make it work? I need to make it tomorrow for my sister’s birthday. THANK YOU for your help!
@Nicole, I also was coming to the comments to look for this answer. Did you every try it with your sister’s birthday cake? How did it go?
This is so pretty! Such a fun treat for Valentine’s Day. My family would love this. Pinned.
Love the natural color of this beautiful pie! You’d never know it was dairy free and gluten free! Pinned
I love that this is gluten and dairy free, Michelle! And it looks AMAZING!